

Are you looking for the best bodyweight workout for beginners at home? Look no further! In this article, we will discuss the best bodyweight workout for beginners that you can do right in the comfort of your own home, without any equipment. This workout is designed to be easy and accessible, allowing you to build strength and familiarity with exercises before heading to the gym. With five simple exercises targeting different muscle groups, such as squats, lunges, knee push-ups, knee planks, and quadruped limb raises, you’ll be on your way to a stronger and healthier body in no time. So grab your workout mat, put on some comfortable clothes, and let’s get started! Remember to consult a medical professional before starting any new workout routine, as well as considering weight loss if necessary before diving into exercises with weights. And don’t forget to warm up and repeat the entire set three times for maximum benefits. Plus, we’ll even share some tips and proper form for each exercise to ensure you get the most out of your workout while keeping yourself safe. Ready to crush your fitness goals? Let’s do this!
Warm Up
Before diving into your bodyweight workout, it’s crucial to warm up properly. Warming up prepares your body for the upcoming physical activity, helps increase blood flow to your muscles, and reduces the risk of injury. A good warm-up not only increases your performance but also enhances your overall workout experience.
Importance of Warm Up
Warming up is essential for a safe and effective workout. It helps loosen up your muscles and joints, allowing for a greater range of motion during exercise. By gradually increasing your heart rate and body temperature, warming up also prepares your cardiovascular system for the upcoming challenges. Additionally, a proper warm-up primes your nervous system, improving coordination and reaction time.
Recommended Warm Up Exercises
To get your body ready for the workout ahead, here are a few recommended warm-up exercises:
- Jumping Jacks: Start by standing with your feet together and arms by your sides. Jump while spreading your legs wide and simultaneously raising your arms above your head. Repeat this motion for a set duration or a specific number of reps.
- Arm Circles: Stand with your feet shoulder-width apart and extend your arms out to the sides. Begin making small circles with your arms, gradually increasing the size of the circles. After a short duration, reverse the direction of the circles.
- High Knees: Stand tall and start jogging in place, bringing your knees up as high as possible with each step. Engage your core and swing your arms to add momentum to the movement.
- Leg Swings: Find a sturdy support, like a wall, and face it while standing on one leg. Hold onto the support for balance and swing your leg forward and backward, increasing the range of motion gradually. Switch legs and repeat the movement.
- Shoulder Rolls: Stand up straight and roll your shoulders in a circular motion, starting from forward and moving back. Perform 10-15 rolls in each direction.
Remember, the warm-up should last around 5-10 minutes, gradually increasing the intensity as you go. Listening to your body and paying attention to any tightness or discomfort is important. Once you’ve completed the warm-up, you’re ready to move on to the main workout!
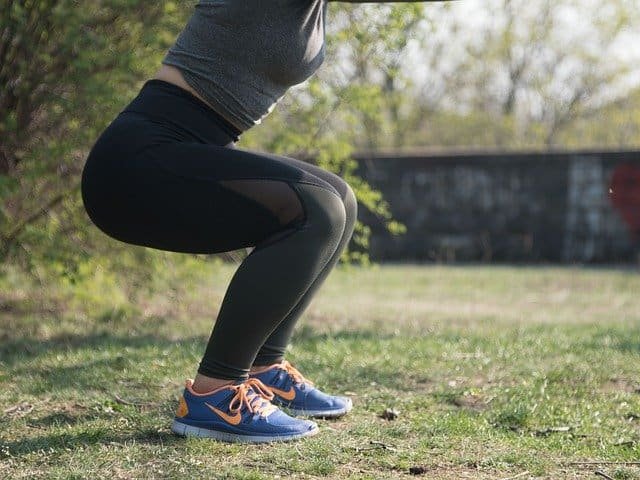
Exercise 1: Squats
Squats are a fantastic exercise to kickstart your bodyweight workout. This compound movement engages multiple muscle groups, including your quadriceps, hamstrings, glutes, and core. Squatting not only helps build leg strength but also enhances overall body function.
Benefits of Squats
Squats offer a wide range of benefits, making them a valuable addition to your workout routine. Here are some key advantages of incorporating squats into your fitness regimen:
- Torches Fat: Squats are great for burning calories and shedding excess fat, making them an excellent choice for those looking to lose weight.
- Builds Leg Muscles: Squats primarily target the muscles in your legs, such as the quadriceps, hamstrings, and glutes. Regular squatting can significantly increase leg strength and muscle tone.
- Enhances Core Stability: As a compound movement, squats engage the muscles in your core, including the abdominals and lower back. By strengthening these muscles, squats contribute to improved core stability and better posture.
- Increases Functional Strength: The functional strength gained from squats translates to real-life activities, such as carrying groceries or climbing stairs. Squats help you perform these tasks with ease and lower the risk of injury.
- Boosts Athletic Performance: Whether you’re a runner, cyclist, or participate in any other sport, squats can enhance your athletic performance. By targeting multiple muscle groups, squats improve overall strength and power.
Proper Form and Technique
To reap the maximum benefits from squats and minimize the risk of injury, it’s crucial to maintain proper form and technique. Follow these steps to perform squats correctly:
- Stand with your feet slightly wider than shoulder-width apart, toes pointing slightly outward.
- Engage your core, keep your back straight, and maintain a neutral spine throughout the movement.
- Begin the squat by bending your knees and lowering your hips back as if you’re sitting on a chair. Keep your chest up and your weight on your heels.
- Descend until your thighs are parallel to the ground or as low as your flexibility allows. Avoid letting your knees collapse inward.
- Engage your glutes and hamstrings to drive through your heels and return to the starting position.
- Exhale as you push up and inhale as you lower down.
Remember, it’s essential to start with lighter weights or just your body weight to ensure you have the proper form before adding additional resistance. Gradually increase the challenge by either adding weights or performing more repetitions.
Variations and Progressions
Once you have mastered the basic squat, you can explore different variations and progressions to keep your workouts interesting and challenging. Here are a few options to consider:
- Goblet Squats: Hold a dumbbell or kettlebell in front of your chest while performing squats. This variation increases the difficulty and engages your core muscles even more.
- Jump Squats: Add an explosive element to your squats by adding a jump at the end of each repetition. This variation helps improve power and explosiveness in your leg muscles.
- Single-Leg Squats: Elevate one foot off the ground and perform squats on the other leg. This progression challenges your balance and targets each leg individually.
Remember, progressive overload is the key to continual progress and avoiding plateaus. As you become more comfortable and stronger, don’t be afraid to challenge yourself by trying new variations and increasing the intensity of your squats.
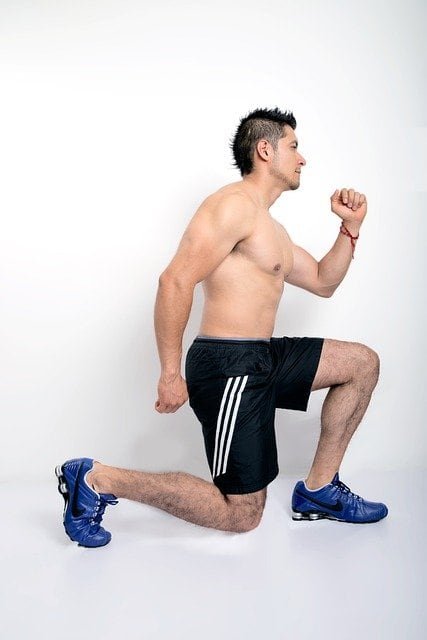
Exercise 2: Lunges
Lunges are another excellent bodyweight exercise for beginners that effectively target the muscles in your lower body. By isolating each leg individually, lunges help improve balance, stability, and functional strength.
Benefits of Lunges
Incorporating lunges into your workout routine offers a variety of benefits. Here are some reasons why lunges are a fantastic exercise choice:
- Tones Legs and Glutes: Lunges primarily target the quadriceps, hamstrings, and glutes, helping to improve muscle tone and leg strength.
- Improves Balance and Stability: Lunges require a strong core and good balance, making them an excellent exercise to enhance stability and proprioception.
- Boosts Functional Strength: Lunges mimic movements often performed in everyday life, such as walking and climbing stairs. By strengthening the muscles involved in these activities, lunges improve overall functional strength.
- Targets Multiple Muscle Groups: Lunges engage several muscles simultaneously, including the quadriceps, hamstrings, calves, and glutes. This compound movement helps save time and maximize the effectiveness of your workout.
- Enhances Hip Flexibility: Executing lunges requires proper hip mobility. By regularly performing lunges with good form, you can improve the flexibility and range of motion in your hip joint.
Proper Form and Technique
To ensure you’re maximizing the benefits of lunges and avoiding injury, it’s crucial to maintain proper form and technique. Follow these steps to perform lunges correctly:
- Begin by standing tall with your feet hip-width apart.
- Take a step forward with one foot, ensuring that your leg is at a 90-degree angle when you lower down.
- Lower your body by bending your knees until your front thigh is parallel to the ground. The back knee should be hovering just above the floor.
- Keep your torso upright and your chest lifted throughout the movement. Engage your core to maintain stability.
- Push through your front heel to return to the starting position.
- Repeat the movement on the opposite side.
Variations and Progressions
Once you have mastered the basic lunge, you can experiment with different variations and progressions to add variety and challenge to your workouts. Here are some options to consider:
- Reverse Lunges: Instead of stepping forward, take a step backward to perform the lunge. This variation shifts the emphasis to your glutes and hamstrings.
- Curtsy Lunges: Cross one leg behind the other, position your feet diagonally, and perform a lunge. This variation targets the glutes and inner thighs.
- Walking Lunges: Instead of returning to the starting position after each repetition, keep stepping forward with your lunges. Walking lunges provide a cardiovascular element to your workout and challenge your endurance.
Remember, similar to squats, gradual progression is vital to continue challenging your muscles and avoiding plateaus. Experiment with different lunges and add resistance as your strength improves.
Exercise 3: Knee Push-Ups
Push-ups are a classic exercise that targets the muscles in your chest, shoulders, and triceps. However, if you’re new to exercise or find traditional push-ups too challenging, knee push-ups are an excellent modification to build strength and gradually progress toward the full version.

Benefits of Knee Push-Ups
Incorporating knee push-ups into your routine offers several benefits:
- Tones Arms and Chest: Knee push-ups effectively engage the muscles in your upper body, including your chest, shoulders, and triceps. The exercise helps tone and strengthen these muscle groups.
- Builds Upper Body Strength: By performing knee push-ups, you gradually build strength in your arms and chest, making it easier to progress to full push-ups in the future.
- Promotes Core Stability: Knee push-ups engage your core muscles, including the abdominals and lower back, to stabilize your body during the exercise.
- Assists Proper Push-Up Form: Practicing knee push-ups allows you to focus on mastering and maintaining proper push-up form before progressing to full push-ups.
Proper Form and Technique
To ensure you’re performing knee push-ups correctly and effectively, follow these steps:
- Begin by kneeling down on a comfortable surface. Position your hands slightly wider than shoulder-width apart on the ground, with your fingers pointing forward.
- Extend your legs behind you, crossing your ankles. Keep your body in a straight line from your knees to your head.
- Lower your chest toward the ground, bending your elbows and keeping them close to your sides. Aim to bring your chest as close to the ground as possible.
- Push through your hands to extend your arms back to the starting position.
- Remember to engage your core and maintain a neutral spine throughout the movement. Keep your head in line with your body and avoid sagging your hips.
Variations and Progressions
As you get stronger and more comfortable with knee push-ups, you can gradually increase the challenge by trying different variations and progressions. Here are a few options to consider:
- Incline Push-Ups: Instead of kneeling on the ground, place your hands on an elevated surface, such as a bench or step. The higher the surface is, the easier the push-up becomes.
- Negative Push-Ups: Begin in the push-up position with your hands shoulder-width apart. Lower yourself as slowly as possible until your chest touches the ground, using your knees for support. Push back up to the starting position using your hands only.
- Full Push-Ups: Once you have built enough upper body strength and mastered proper form, you can progress to full push-ups from your toes. Remember to engage your core, keep your body in a straight line, and maintain control throughout the movement.
Remember, consistency is key. Aim to increase the number of repetitions and gradually decrease the support from your knees as you get stronger. With patience and persistence, you’ll progress to performing full push-ups in no time!
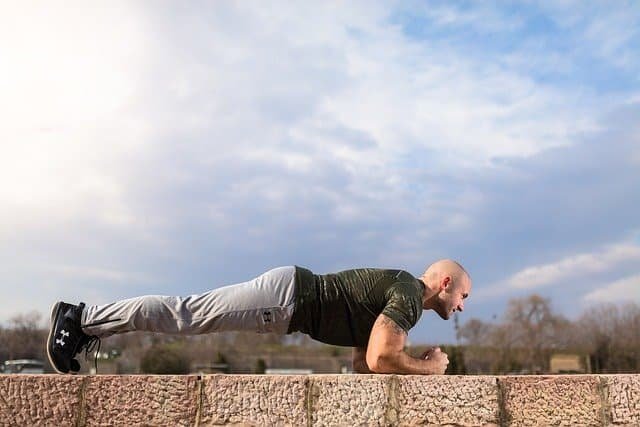
Exercise 4: Knee Planks
Planks are an excellent exercise for strengthening your core muscles, including your abdominals, obliques, and lower back. However, if you’re new to exercise or find traditional planks too challenging, knee planks provide a modified version that allows you to build core strength over time.
Benefits of Knee Planks
Incorporating knee planks into your workout routine offers several benefits:
- Tones Core Muscles: Knee planks effectively engage your core muscles, helping to strengthen and tone your abs, obliques, and lower back.
- Improves Posture: Consistently performing knee planks helps improve your posture by strengthening the muscles that support your spine.
- Low Impact on Joints: Knee planks put less stress on your wrists and shoulders compared to traditional planks, making them a suitable option for individuals with joint issues.
- Builds Core Stability: By holding a knee plank position, you challenge your core muscles to maintain stability, leading to better balance and overall body control.
Proper Form and Technique
To ensure you’re performing knee planks correctly and effectively, follow these steps:
- Begin by positioning yourself on all fours, ensuring that your wrists are aligned with your shoulders and your knees are aligned with your hips.
- Lower your forearms to the ground, keeping your elbows directly beneath your shoulders. Your forearms should be parallel to each other, with your hands relaxed.
- Extend your legs behind you, crossing your ankles. Your body should form a straight line from your head to your knees.
- Engage your core muscles by pulling your belly button toward your spine. Keep your head in line with your body, avoiding any sagging or lifting of your hips.
- Hold the knee plank position for a specified duration, aiming to maintain proper form throughout.
- Gently release the position and rest before repeating the exercise.
Variations and Progressions
Once you have mastered the knee plank and feel comfortable holding the position, you can gradually challenge yourself with different variations and progressions. Here are a few options to consider:
- Forearm Planks: Instead of supporting your weight on your knees, extend your legs fully and support your body on your forearms and toes. This progression targets your core muscles more intensively and increases overall difficulty.
- Side Planks: From the forearm plank position, rotate your body to one side, balancing on one forearm and the edge of your bottom foot. Extend your top arm toward the ceiling. Side planks engage your obliques and help develop strong, toned sides.
- Dynamic Planks: Add movement to your planks by incorporating movements such as plank jacks, where you jump your feet out to the sides and back in, or plank shoulder taps, where you alternate tapping each hand to the opposite shoulder.
Remember, consistency is key when it comes to building core strength. Gradually increase the duration of your knee planks and challenge yourself with the progressions to continually improve your core stability and overall fitness.
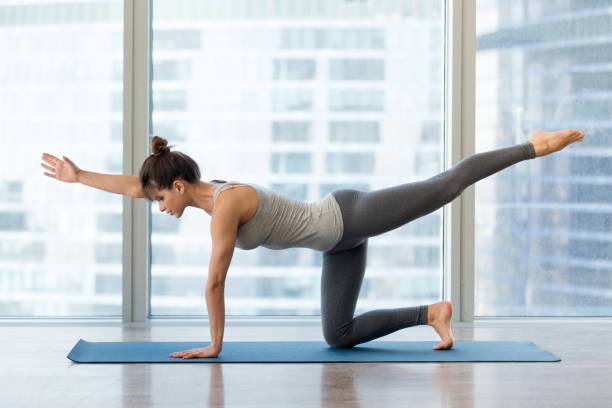
Exercise 5: Quadruped Limb Raises
Quadruped limb raises are an effective bodyweight exercise that targets the muscles in your back, glutes, and shoulders. This exercise improves posture, strengthens your back muscles, and enhances stability in your core.
Benefits of Quadruped Limb Raises
Incorporating quadruped limb raises into your workout routine offers several benefits:
- Strengthens Back Muscles: Quadruped limb raises target the muscles in your upper and lower back, helping to improve muscular strength and endurance.
- Enhances Posture: By engaging the muscles responsible for maintaining proper posture, quadruped limb raises help correct imbalances and promote a healthier alignment.
- Engages Core Stabilizers: Quadruped limb raises require you to engage your core muscles to stabilize your body during the movement. This exercise can help improve overall core strength and stability.
- Activates Glutes: As you raise your leg, quadruped limb raises also engage your glute muscles, contributing to better lower body strength and stability.
Proper Form and Technique
To ensure you’re performing quadruped limb raises correctly and effectively, follow these steps:
- Begin on all fours, with your hands aligned beneath your shoulders and your knees beneath your hips. Maintain a neutral spine with a slight natural curve in your lower back.
- Engage your core muscles by drawing your belly button toward your spine. Keep your head in line with your spine, avoiding any excessive tilting.
- With your core engaged and back muscles activated, raise one arm off the ground and extend it forward until it’s in line with your ear. Simultaneously, extend the opposite leg straight back until it’s in line with your hip.
- Hold this position briefly, feeling the engagement in your back and glute muscles.
- Return your arm and leg to the starting position while maintaining control and stability.
- Repeat the movement on the opposite side, alternating between your left and right sides.
Remember to focus on quality over quantity. Make sure to maintain proper form and engage the targeted muscles throughout the exercise.
Variations and Progressions
Once you have mastered the basic quadruped limb raise and feel comfortable with the movement, you can challenge yourself by trying different variations and progressions. Here are a few options to consider:
- Contralateral Limb Raises: Instead of raising the arm and leg on the same side, raise the opposite arm and leg simultaneously. This variation increases the difficulty by challenging your balance and coordination.
- Resisted Quadruped Limb Raises: Add resistance by using ankle weights or resistance bands around your ankles. The added resistance increases the workload on your glutes and back muscles.
- Bird Dogs: From the quadruped position, extend one arm forward while simultaneously extending the opposite leg back. Maintain balance and control throughout the movement before returning to the starting position. Bird dogs increase the challenge by incorporating a balance component.
Remember, gradually increasing the difficulty of the exercise will help you continue to progress and avoid hitting a plateau. Listen to your body and start with lower repetitions before gradually increasing the volume as you get stronger.
Repeat and Sets
To maximize the effectiveness of your bodyweight workout, it’s recommended to perform the entire set of exercises in a circuit format. This means completing one set of each exercise sequentially, with minimal rest in between. After completing the entire circuit, take a brief rest before repeating the circuit for the desired number of sets.
Recommended Repetitions and Sets
For beginners, it’s advisable to start with three sets of 8-12 repetitions for each exercise. This rep range allows you to focus on proper form and gradually build strength and endurance. As you become more comfortable with the exercises, you can increase the number of repetitions or sets to continue challenging your muscles.
Remember, the number of repetitions and sets can be customized based on your fitness level, goals, and available time. Listen to your body and adjust the intensity accordingly.
Rest Periods
In between exercises, it’s best to take minimal rest to keep your heart rate elevated and maintain the cardiovascular benefits of the workout. Aim for around 15-30 seconds of rest between exercises in the circuit. After completing one full circuit, take a slightly longer rest period of 1-2 minutes before starting the next circuit.
Monitoring and Tracking Progress
Monitoring your progress is essential to stay motivated and ensure you’re making improvements over time. Tracking your workouts allows you to see how far you’ve come and set measurable goals for the future. Here are a couple of ways to monitor your progress during your bodyweight workout:
Importance of Monitoring
Monitoring your progress can help you identify areas of improvement and gauge your overall fitness level. By keeping track of the number of repetitions, sets, and rest periods, you’ll be able to gradually increase the challenge and track your progress over time. It’s also a great way to ensure you’re consistently pushing yourself and avoiding plateauing.
Using a Fitness Smartwatch
A fitness smartwatch can be a valuable tool in monitoring your workouts. These devices offer features such as heart rate tracking, step counting, and workout summaries. By wearing a fitness smartwatch during your bodyweight workout, you can easily monitor your heart rate, track the duration of your workout, and keep an eye on your overall progress. Check out some of the best smartwatches here
Remember, while a fitness smartwatch can provide helpful data, it’s essential to listen to your body and focus on your form and overall well-being during the workout. Monitoring progress is just one component of a successful fitness journey.
Tracking Heart Rate
During your bodyweight workout, it can be useful to monitor your heart rate to ensure you’re working at an appropriate intensity level. To do this, lightly touch your index and middle fingers to your carotid artery or wrist to feel your pulse. Count the number of beats for 15 seconds and multiply that number by 4 to get your heart rate per minute (bpm).
Monitoring your heart rate allows you to stay within your target heart rate zone, which ensures you’re challenging yourself without overexertion. The target heart rate zone is typically 50-70% of your maximum heart rate. To calculate your maximum heart rate, subtract your age from 220. You can also use a fitness smartwatch.
By tracking your heart rate and aiming to work within the target heart rate zone, you can optimize the cardiovascular benefits of your bodyweight workout and make sure you’re training in a safe and effective range.
Consulting a Medical Professional
Before beginning any exercise program, especially if you have any pre-existing medical conditions or concerns, it’s crucial to consult a medical professional. They can assess your individual situation and provide guidance on the appropriate exercises and intensity levels for your specific needs.
A medical professional can also provide specific recommendations on modifications or exercise alternatives based on your unique circumstances. They will consider any existing injuries, health conditions, or concerns, ensuring that you engage in exercises that are safe and suitable for you.
Remember, your health and well-being should always be the top priority, and seeking professional advice is an important step in embarking on any fitness journey.
Conclusion
Embarking on a bodyweight workout routine is a fantastic way for beginners to build strength, improve posture, and enhance overall fitness. The exercises discussed in this article – squats, lunges, knee push-ups, knee planks, and quadruped limb raises – offer a comprehensive full-body workout that requires no equipment and can be done at home.
By starting with a proper warm-up, you prepare your body for the workout ahead, increase flexibility, and reduce the risk of injury. Focus on maintaining proper form and technique for each exercise to maximize effectiveness and minimize the chance of injury.
Increasing the intensity and challenging yourself with variations and progressions will help you continue making progress and avoid hitting a plateau. Listening to your body and gradually increasing the number of repetitions or sets ensures steady improvement without overexertion.
Tracking your progress and monitoring your heart rate can provide valuable insights into your fitness level and help you set and achieve specific goals. Consider using a fitness smartwatch to easily keep track of your workout duration, heart rate, and other relevant data.
Remember, before starting any exercise program, consult a medical professional, especially if you have any pre-existing medical conditions or concerns. They can provide personalized guidance and ensure that the exercises you choose are appropriate for your individual needs.
So lace up those shoes, grab a mat, and get ready to challenge yourself with these beginner-friendly bodyweight exercises. With consistency, determination, and the proper form, you’ll be well on your way to improving your overall fitness and well-being. Stay motivated, listen to your body, and enjoy the best bodyweight workout for beginners at home!